

How to Prepare for Experiment 38 Pre-Lab Assignment? 7 Essential Tips for Chemistry Students
Experiment 38 pre laboratory assignment remains a cornerstone lab in general chemistry. In this comprehensive guide, you’ll learn how to ace the Experiment 38 pre-laboratory assignment. We’ll cover tips on mastering calculations, memorising chemical tests, writing balanced equations, and more to help you walk into the lab confident and well-prepared.
Assume that you’re in the lab for experiment 38 pre laboratory assignment. And your task is to find the metal cations in an unknown solution. However, rushed pre-lab prep has left you mixing up reagents. Hence, your session turns into confusion. The above-described is one of the common scenarios that students face in their chemistry lab.
Experiment 38: Qualitative Analysis of Cations remains a staple in general chemistry courses. Because it teaches fundamental lab skills and analytical thinking. But without solid preparation, it can feel like a cruel rite of passage.
The rest of this article will walk you through everything you need to know to ace your Experiment 38 pre laboratory assignment. We’ll start by outlining what a typical Experiment 38 pre-lab entails, its structure, key components, and common questions. Then we’ll dive into 7 essential tips for Experiment 38 preparation. These tips cover how to take care of your assignment. Let’s get into the details.
Key Points
- Experiment 38 typically involves qualitative analysis of six common cations (Na⁺, K⁺, NH₄⁺, Mg²⁺, Ca²⁺, Cu²⁺). Knowing the experiment’s aims and the cations involved is the first step in effective preparation.
- Completing the pre-lab assignment ensures you grasp the theory, safety, and procedure. Students who do pre-labs come better prepared.
- We break down 7 actionable tips. These include anticipating calculation questions to memorising confirmatory tests and practising with flowcharts.
- Follow a structured preparation plan: review the lab manual, gather background knowledge, systematically answer pre-lab questions, simulate the experiment and manage your time. We provide a five-step experiment 38 pre lab assignment guide to streamline your prep.
- Pre-lab prep isn’t just about grades; it’s about safety and efficiency. We highlight how being prepared reduces mistakes and accidents.
Typical Structure of the Experiment 38 Pre-Lab Assignment
Before jumping into tips, it helps to know what an experiment 38 pre laboratory assignment actually looks like. In general, a pre-lab assignment is a set of tasks you must complete before the lab session. Here’s what you can expect from the structure and key components:
Background Reading
You’ll typically be instructed to read the experiment introduction in your lab manual or textbook. For example, it might review solubility rules or why certain reagents cause specific ions to precipitate. Don’t skip this reading! It frames why you’re doing each step and often contains hints for the pre-lab questions. Make sure you understand the qualitative analysis scheme and terms like “confirmatory test” or “centrifugate”.
Wayne J., a PhD writer at The Academic Papers UK, a leading assignment writing service, emphasises that a thorough review of the experimental introduction is a foundational step in any laboratory exercise. He advises that students should engage critically with the context and objectives provided either in the lab manual or the relevant textbook.
Theory Questions
Pre-lab assignments often start with a few questions on theory. Around 27% of researchers never perform a risk assessment before lab work. Understanding these questions can help you mitigate the issues related to the lab. In experiment 38 pre laboratory assignment, these could be questions like: “Which cations are confirmed by a precipitate, and what are the formulas of those precipitates?” or “Which ion is detected by the evolution of a gas?”
Procedure and Flowchart
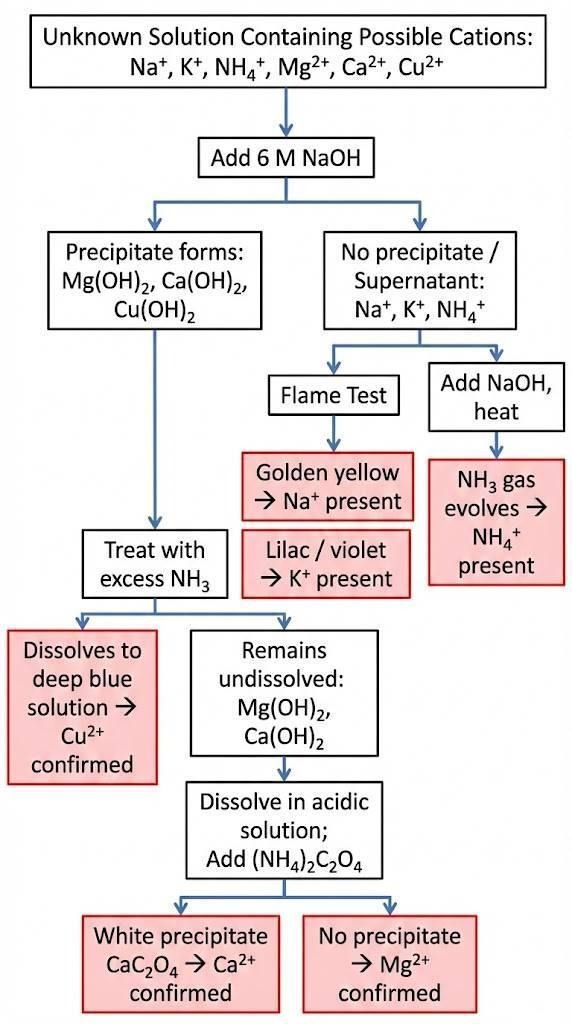
Experiment 38 involves a multi-step procedure to separate and test for each ion. Pre-labs commonly include a section where you outline or complete a flowchart of the separation scheme. You might see an incomplete flow diagram of the experiment’s steps and be asked to fill in missing parts. For example, you might need to indicate that adding NaOH precipitates Mg(OH)₂ and Ca(OH)₂, while Na⁺, K⁺, and NH₄⁺ remain in solution. Then, adding heat and base releases NH₃ from NH₄⁺ in the supernatant, etc.
7 Essential Tips to Prepare for Experiment 38 Pre-Lab Assignment
Preparation is both about knowing the content and strategising your study time. Here are seven tried-and-true tips to help you tackle the Experiment 38 pre laboratory assignments like a pro. These experiment 38 pre lab assignment tips target common challenge areas and use insights from educators and students. Follow them, and you’ll enter the lab with clarity instead of nerves.
1. Anticipate the Calculation Challenges
While experiment 38 pre laboratory assignment is mainly qualitative, don’t be caught off guard if your pre-lab has a calculation question. Many instructors slip in a related calculation to reinforce quantitative skills. If you struggle with questions, learn how to write a practical assignment to strengthen your skills.
Nevertheless, calculations involve solution prep, yield estimation, or error analysis. Anticipating these questions will save you from blanking out when you sit down to do the assignment. Consider the typical calculation types and how to approach them:
| Calculation Type | What to Watch For |
| Dilution Problems | Use the formula C₁V₁ = C₂V₂ correctly. Identify which is the stock vs the final solution. Pay attention to units (convert mL to L if needed) and ensure you add acid to water (for safety) if making dilutions. |
| Percent Yield | Find the limiting reactant first if a reaction is involved. Then calculate theoretical yield vs actual. Be clear on the formula: % yield = (actual/theoretical) × 100%. If the pre-lab provides “mock” data, practice the math so you’re not doing it cold. |
| Error Analysis | Think conceptually: if a step is done wrong, does the result go high or low? For example, if a test tube wasn’t clean and introduced contaminants, would that give a false positive? Be ready to explain common errors like overshooting a titration endpoint or not fully precipitating an ion, and how those affect results. |
2. Memorise the Confirmation Tests for Each Cation
Experiment 38 pre laboratory assignment is essentially a detective game where each ion has its own “tell”. To confidently answer pre-lab questions, memorise the unique confirmation test for each of the 6 cations. Making a quick-reference chart or flashcards can be extremely helpful. Here’s a rundown of the common ions and their signature tests:
- Sodium (Na⁺): Yields a bright yellow flame in flame tests.
- Potassium (K⁺): Produces a pale violet (lilac) flame that can be hard to see with sodium around. Often, you view it through cobalt glass, which filters out sodium’s yellow light to reveal potassium’s lavender flame.
- Ammonium (NH₄⁺): Confirmed by ammonia gas (NH₃) evolution. You’ll detect it by its distinct pungent smell and by holding damp red litmus paper near the test tube mouth (it will turn blue).
- Magnesium (Mg²⁺): Forms a white precipitate of magnesium hydroxide when NaOH is added (since Mg(OH)₂ is only sparingly soluble).
- Calcium (Ca²⁺): often confirmed by a white precipitate of calcium oxalate. Typically, after removing other ions, you add ammonium oxalate (e.g. (NH₄)₂C₂o₄), and a white precipitate of CaC₂o₄ forms if Ca²⁺ is present. Calcium also gives a brick-red flame (more orange-red).
- Copper (Cu²⁺): Has a couple of dramatic identifiers. Adding base (NaOH) initially gives a pale blue precipitate of Cu(OH)₂. More definitively, adding excess ammonia (NH₃) dissolves the precipitate and yields a deep blue solution due to the formation of the complex ion [Cu(NH₃)₄]²⁺.
3. Practice Writing Balanced Equations for the Key Reactions
Chemical equations are the language that connects your observations to chemistry. In experiment 38 pre laboratory assignment, you could be expected to write balanced equations for some of the reactions, including precipitations or gas evolution. It is a good idea to practise those beforehand. Write down the reaction, including states and charges, as you would explain it to another person. Here are some common equations of the experiment:
- Formation of Complex (Copper example): When copper(II) reacts with ammonia, it yields the dark blue complex ion:
Cu2++ 4NH3 → [Cu(NH3)4]2+
- Gas Evolution (Ammonium example): Ammonium and hydroxide reaction:
NH4+ +OH– →NH3 ↑+H2O
(The arrow up ↑ indicates a gas released.) This shows that when NH₄⁺ (a weak acid) meets OH⁻ (base), you get NH₃ gas and water.
- Precipitation (Calcium example): Calcium with oxalate:
Ca2+ + C2O2-4 → CaC2O4(s)↓
(The arrow down ↓ denotes a solid precipitate.) If the source of oxalate is ammonium oxalate, you could write the full reaction including NH₄⁺, but since NH₄⁺ is spectator (it stays in solution), focusing on Ca²⁺ + C₂o₄²⁻ → CaC₂o₄↓ is fine.
- Precipitation (Magnesium example): Magnesium with hydroxide gives a white Mg(OH)₂ solid.
Mg2+ + 2OH– → Mg (OH)2 (s)↓
4. Create or Study a Cation Separation Flowchart
One of the most useful study aids for qualitative analysis labs is a flowchart of the procedure. If your pre-lab assignment doesn’t provide a blank flowchart to fill in, take the initiative to draw your own. This visual road map of Experiment 38 will clarify the sequence of steps and the logic behind them. Here’s how you can approach it:
Start by listing all six cations at the top of your chart. Then map out the reagents added in the order of the experiment, branching the chart based on what happens:
- Add 6 M NaOH: on your chart, draw an arrow down from “NaOH added” and split into two branches: one for the precipitate and one for the supernatant. Label those branches.
- Centrifuge & Separate: Indicate that you centrifuge and decant. The precipitate will be processed in further steps, while the liquid goes on for Na/K/NH₄ tests.
- Supernatant Tests (Na⁺, K⁺, NH₄⁺): From the supernatant branch, you can show two tests: a flame test portion and an ammonium test portion. Often, you’d take a part of the supernatant and perform flame tests.
- Precipitate Tests (Mg²⁺, Ca²⁺, Cu²⁺): Back to the precipitate from the NaoH step. Usually, the next step is to treat that precipitate with another reagent to separate Cu from the group.
- Further separating Mg vs Ca: Now you have Mg²⁺ and Ca²⁺ left in a solid form. A typical step is to add ammonium oxalate to that solid in an acidic solution to test for Ca²⁺. Ca²⁺ will precipitate as CaC₂o₄ (white), while Mg²⁺ stays in solution. Here is how a typical flowchart will look:
5. Note Characteristic Colours and Physical Changes
Qualitative analysis is visual by nature due to the chemical’s properties. Colours of solutions, colours of flames, the appearance of precipitates, bubbling gases, these are your evidence for what’s in the test tube. Here are some characteristic observations from experiment 38 pre laboratory assignment, to keep in mind:
- Flame colours: Sodium’s intense yellow (like a streetlamp), potassium’s pale violet (often appearing pinkish through cobalt glass), calcium’s red-orange (brick red).
- Precipitate colours: Most group I/II cation precipitates are white, which can be tricky because you need context to know which white solid is which. If you see a blue precipitate upon adding NaOH, that’s a sign of Cu²⁺.
- Solution colours: When Copper forms the ammonia complex, the solution turns deep royal blue. This is a key positive test. Magnesium and calcium solutions are colourless, as are Na⁺, K⁺ and NH₄⁺.
- Gas and odour: Ammonia gas is one of the few smelly clues in a general chemistry lab. It has a sharp, pungent smell. No other common cation here produces a gas; NH₄⁺ is unique in that regard.
- Physical changes: Note things like exothermic reactions. If you have to heat the test tube, mention that in describing the procedure, e.g. “heat gently after adding NaOH to drive NH₃ out”. Also, the requirement to use a centrifuge indicates that some precipitates form that need separation.
6. Review Bronsted Acid-Base Concepts in Context
A sneaky theoretical point often touched on in experiment 38 pre laboratory assignment is the concept of Bronsted-Lowry acid-base reactions. Specifically, the ammonium test is a nice experiment 38 pre lab assignment example: NH₄⁺ acts as a Bronsted acid (proton donor) when it reacts with a strong base.
Assignment writing services UK can improve your understanding and guide you on how to answer questions like, Why does this matter? Well, your pre-lab might directly ask something like, “Which cation in Experiment 38 is confirmed via a Bronsted acid-base reaction?” – the answer being ammonium. Or it might ask you to explain the chemistry of that test in acid-base terms.
So, brush up on your general acid-base theory as it applies here. Understand conjugate acid-base pairs: NH₄⁺/NH₃ is one pair in this experiment. You might recall that ammonium salts are acidic in water because of that equilibrium releasing H⁺.
7. Practice with Sample Questions
Lastly, simulating the experiment 38 pre laboratory assignment is one of the most effective possible ways of preparing. Collect all sample questions that you have. You can find them in your lab manual, or you may have a practice experiment 38 pre lab worksheets that your teacher gave you. Attempt to answer these without notes and check your answers. The following are some of the common experiment 38 pre lab questions and how to approach them:
Q: Which cation(s) are confirmed by the formation of a precipitate? Write the formulae of the precipitates.
A: Mg²⁺ and Ca²⁺ are confirmed by precipitates. Mg²⁺ gives Mg(oH)₂ (white), Ca²⁺ gives CaC₂o₄ (white). But its final confirmation is by a coloured solution, so they likely expect Mg and Ca here.
Q: Which cation is confirmed by the evolution of a gas?
A: That’s NH₄⁺ (ammonium), via the release of NH₃ gas upon adding NaOH. Make sure to state the ion (ammonium) and perhaps mention “the gas evolved is ammonia, detected by smell or litmus.”
Q: Explain what is meant by “balance the centrifuge” and why it’s important.
A. Balancing the centrifuge implies having tubes with approximately equal amounts of liquid opposite to each other, so that the centrifuge does not wobble. This would be needed to avoid centrifuge damage and to achieve successful separation of the precipitate.
Q: Identify the cation confirmed by a deep blue complex ion in Experiment 38.
A: That’s Cu²⁺. The deep blue complex is [Cu(NH3)4]2+. To show off, you could write the formula of the complex as asked, or at least name it (tetraamminecopper(II)). But likely just saying “copper(II) is confirmed by the deep blue [Cu(NH₃)₄]²⁺ complex in solution” is enough.
Step-by-Step Preparation Guide for Pre-Lab Assignment
Here’s a step-by-step guide to preparing for Experiment 38 pre laboratory assignment. Follow these steps in order, and you’ll cover all the bases without last-minute panic.
- Review the Lab Manual and Assignment: Start by reading the Experiment 38 description in your lab manual (or handout) twice. Note any specific experiment 38 pre laboratory instructions, and mark the pre-lab questions. This also helps you prepare for lab safety. In fact, there is a 25.8% decrease in incidents after proper training.
- Gather Background Knowledge: Now fill in any gaps in understanding. If there were concepts in the intro that felt fuzzy, do a quick refresh. Use reliable resources like your textbook or reputable online sources (the Royal Society of Chemistry’s student resources, Khan Academy videos, etc.) to reinforce these concepts.
- Answer the Pre-Lab Questions Systematically: Time to tackle the pre-lab assignment itself. Don’t just jump in randomly, approach it in an order that makes sense. Start with the theory and concept questions while the background info is fresh in your mind.
- Simulate the Experiment (Virtually if Possible): If you have access to a virtual lab simulation or even a recorded demo of experiment 38 pre laboratory assignment, definitely use it at this stage. Doing a dry run of the lab in a simulation can boost your confidence immensely.
- Manage Your Time and Validate Your Knowledge: Finally, ensure you’ve allocated enough time for everything and test yourself one last time. Don’t do all this at 3 AM the night before; spread it out if you can. Maybe review the manual two days before, draft experiment 38 pre lab answers the next day, etc.
Conclusion
Preparing for a chemistry lab like experiment 38 pre laboratory assignment might feel like studying for an exam, but it’s absolutely worth the effort. Let’s recap some key takeaways: you’ve identified the six cations and their tell-tale tests, and practised writing the chemical equations that underpin those tests. Draw a roadmap (flowchart) of how the experiment will unfold.
Walking into the lab with this level of preparation, you’ll notice a huge difference. And let’s not forget the impact on your grades: instructors can tell when a student is prepared. It often shows in the quality of your experiment 38 pre lab reports, your ability to answer oral questions during the lab, and, of course, the accuracy of your results. Students often buy assignments online to get experiment 38 pre-lab reports that save time and help them achieve better grades.
Frequently Asked Questions about Experiment 38 Pre-Lab Assignment
Q: What mistakes should I avoid in Experiment 38 pre-laboratory assignments?
A: Common pitfalls include rushing through the assignment without understanding it or copying answers from friends. Avoid giving vague answers. Be specific: name the chemical and describe the observation or reaction. Another mistake is not reviewing basic concepts beforehand; if you fumble with writing formulas or equations, that’s a sign you need a refresher.
Q: What should be included in Experiment 38 pre-laboratory assignment?
A: Your pre-lab assignment should include a few key elements to show you’re ready for the experiment. These include theoretical understanding, procedural plan, flow diagram, safety and equipment notes, calculations, clarity and completeness. If anything is left out, that’s a red flag.
Q: Why is the pre-laboratory assignment important for Experiment 38?
A: The pre-lab assignment is important for several reasons. Firstly, it ensures you come prepared. Secondly, it’s a matter of safety and smooth operation. Thirdly, from a learning perspective, the pre-lab assignment is where a lot of the learning happens. Skipping it would be like trying to run a marathon with no training, technically possible, but painful and not pretty.
Q: What are 5 precautions that must be taken before beginning an experiment?
Here are five key precautions to take before you begin any experiment:
- Wear Appropriate PPE: Always don your personal protective equipment before handling any chemicals or equipment. This typically means a lab coat or apron, safety goggles, and gloves appropriate for the chemicals in use.
- Read the Procedure and MSDS: Before starting, thoroughly read the experiment’s procedure. Know the sequence of steps, so you’re not fumbling mid-experiment.
- Check Equipment Setup: Inspect and set up your equipment properly before mixing anything. Ensuring everything is functional and arranged reduces scrambling and accidents.
- Plan for Waste Disposal and Spills: Before beginning, know how you’ll dispose of the chemicals and what to do if there’s a spill. Experiment 38 might generate heavy-metal waste, which shouldn’t go down the drain.
- No Food, No Distractions: It might sound obvious, but labs require focus. Never bring food or drinks into the lab. Put away your phone or at least silence it. Lastly, keep your workspace tidy.